"We spend our lives running from the past, only to find it waiting at the gate of our reunion."
Scenario Overview
There Again is an introductory one-shot scenario designed to serve as a better starter adventure for new players and Tricksters alike. It subverts high school drama tropes—both Japanese manga and American teen film conventions—while introducing the core concepts of Nowhere Land through a dark urban fantasy lens.
- Style: Urban Fantasy / Survival Horror / Social Mystery
- Inspirations: Jujutsu Kaisen, Persona series, Kekkaishi, Gantz, Bleach, Code Lyoko, French-Belgian adult comics
- Recommended for: 4-6 players, 4-hour session (or 2 sessions of 2 hours)
- Tone: Seinen, nostalgic horror, high school reunions gone wrong, dimensional invasion
- Difficulty: Beginner-friendly (designed as introduction to Nowhere Land)
Structure: Time-based countdown with parallel events—Arrival & Socializing (Acts 1-2), The Seven Mysteries (Act 3), Midnight Revelation (Act 4), Soul Craze & Escape (Act 5)
Core Theme: The past never stays buried. The things we ignored, the people we abandoned, the truths we refused to see— they all come back. And tonight, they're bringing friends from Nowhere Land.
Content Warning: This scenario contains themes of bullying, institutional cover-ups, past trauma, body horror, social pressure, and violence. Safety tools (X-Card, Lines & Veils) are recommended. Session Zero discussion advised.
The Three-Clue Architecture
How Players Discover the Truth (Alexandrian Method)
This scenario employs the Three-Clue Rule: for every essential piece of information, there are at least three independent paths to discover it. Players can never get "stuck"—they can only choose how they learn the truth.
CORE REVELATION: "The School Is a Hunting Ground"
- Observe security patterns (guards checking hidden lists, earpiece frequencies)
- NPC confessions (drunk alumni, nervous staff, Satoshi's warnings)
- Environmental tells (sealed rooms, old photographs, ritual markings)
CORE REVELATION: "The Original Gala Ended in Tragedy"
- Library archives (sealed folder, old newspapers, yearbook gaps)
- Memory overlays from the Seven Mysteries (ghostly reenactments)
- Confronting older NPCs (Satoshi, the Deaness, surviving alumni)
CORE REVELATION: "The Portal Can Be Closed"
- Professor Asano's encrypted notes (technology lab)
- Satoshi Konda's manga journals (detailed diagrams)
- The Sion Key artifact (found in sealed lab)
GM Preparation Checklist
Before Session Zero:
- ✓ Review all six pre-generated characters and their Secret Goals
- ✓ Prepare personalized "memory fragments" for each character's school years
- ✓ Create a relationship map showing PC connections
- ✓ Print or prepare the campus map for player reference
- ✓ Prepare the Seven Mysteries reveal cards (one per mystery)
- ✓ Have safety tools ready (X-Card, Lines & Veils)
Before the Main Session:
- ✓ Set up background audio (school ambience, later: horror ambience)
- ✓ Prepare NPC voice notes (Deaness: controlled warmth; Satoshi: weathered urgency)
- ✓ Have the countdown clock visible or on a shared screen
- ✓ Review the multiple endings to improvise toward player choices
- ✓ Prepare at least 3 "revelation moments" per player based on their Secret Goal
The Premise
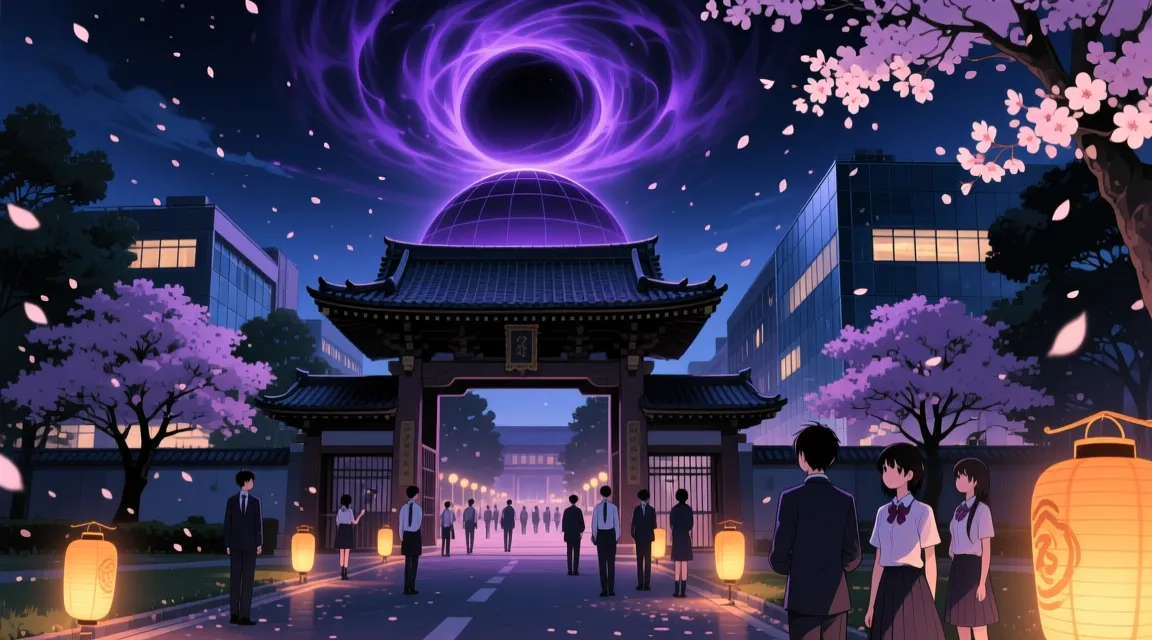
The players are alumni of Nihongi University (日本技大学)—a fictional elite institution modeled on Tokyo University (Todai), serving as primary school, middle school, high school, and university in one sprawling campus. Tonight is the 20th Anniversary Alumni Gala, and everyone's been invited back to celebrate. Old friends, old rivals, old secrets—all converging on one midsummer night.
But something is wrong. The security is too tight. The new deaness smiles too widely. And whispered rumors speak of another gala, twenty years ago, that ended in tragedy—a gala that everyone was paid to forget.
At midnight, the past returns. A Domain of Torture (Alptraumas) forms a dome around the campus, trapping everyone inside. The new deaness reveals the truth: the school has always been a hunting ground, and tonight's guests are the prey. Portals to Nowhere Land begin opening across campus. Entities emerge. The Soul Craze begins.
Campaign Hook: Gateway to Nowhere Land
This scenario serves as a gateway to Nowhere Land proper. By the end, players will have the choice to:
- Enter Nowhere Land voluntarily through a portal, beginning a full campaign as Outsiders
- Be pushed into Nowhere Land by the entity incursion, forced to find their way back
- Seal the breach and remain in the mundane world (one-shot ending, or sequel hook)
- Become something else entirely—touched by domain power, forever changed
The scenario works as a standalone one-shot, but its true power is as a Session Zero with teeth— establishing character relationships through shared history before throwing them into the cosmic unknown.
The Twenty-Year Secret
What Really Happened (GM Eyes Only)
⚠️ This section contains spoilers. Do not share with players.
THE FIRST GALA (20 Years Ago):
The original 10th Anniversary Alumni Gala was the first attempt at tonight's ritual. Professor Asano Sion had discovered a weakening in reality at the observatory—a natural thin point where Nowhere Land's influence bled through. The original Dean Ishikawa (the current Deaness's predecessor and mentor) saw this as an opportunity.
The plan: use the gala to gather enough human potential (fear, memory, connection) to tear open a permanent portal. In exchange for this service, entities from the Domain of Torture would grant the Dean and his inner circle immortality, power, and knowledge beyond mortal understanding.
THE RITUAL FAILED:
Professor Asano discovered the plot and sabotaged the ceremony. In the chaos, seven people died—their deaths now memorialized as the Seven Mysteries. Asano himself was pulled into Nowhere Land, the portal closing behind him. The survivors were paid off, threatened, or "relocated." All records were sealed by mayoral order.
THE INTERVENING YEARS:
The original Dean died five years after the incident—consumed by something that crawled out of his mirror. His protégé, Reiko Ishikawa, inherited his position and his ambition. She spent fifteen years preparing for tonight: placing loyal cultists in key positions, manipulating alumni records, and weakening the barrier further through small rituals.
THE PLAYER CHARACTERS:
All six pre-generated characters were present at the school during the first gala's aftermath. They were children then— in primary school—but they saw things. Strange lights. Adults crying. A teacher who walked into a classroom and never came out. Each of them has a repressed memory that the scenario will activate.
WHY TONIGHT?
The barrier is at its weakest during the summer solstice. The 20th anniversary creates a sympathetic resonance with the original event. And the Deaness has invited back everyone who witnessed the first gala's aftermath—their presence strengthens the ritual, and their deaths will fuel the final breakthrough.
The Setting: Nihongi University
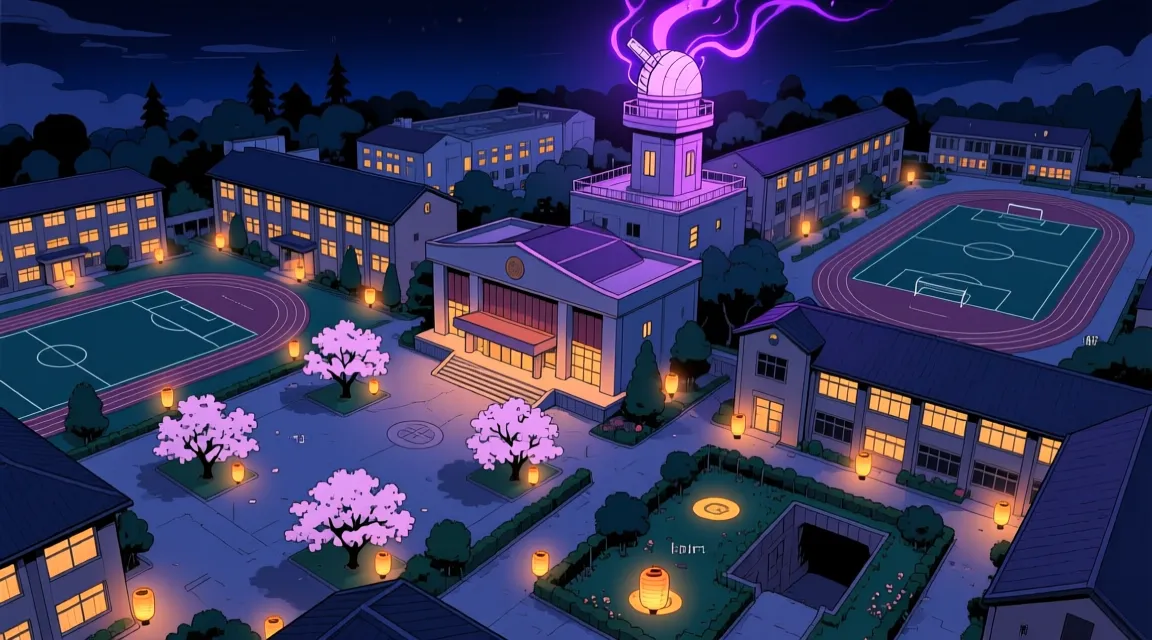
Nihongi (日本技) is a small campus town built around the university—essentially a self-contained academic city. The university itself spans four distinct blocks, each serving a different educational level, with shared facilities between them.
Campus Zones
🏫 Main Building (Central Auditorium)
Where the gala takes place. Grand hall, administrative offices, faculty lounges. The deaness's office is on the top floor. Contains the main stage where the midnight announcement will occur.
🔬 Science Block (University Level)
Laboratories, lecture halls, research facilities. Professor Asano Sion's old Technology Lab is here—now sealed, but not forgotten. The rooftop observatory sits atop this building.
📚 Library & Arts Block (High School)
The massive library, art studios, music rooms, drama theater. Club rooms line the corridors. Many alumni remember secret make-out spots and study hideaways here.
🏃 Sports Complex (Middle School)
Gymnasium, swimming pool, track and field, martial arts dojo, storage rooms. Coach Ashima's domain. The old equipment room has a reputation.
🌸 Primary School Block (East)
Smaller classrooms, colorful murals, the garden with hothouses. Behind the garden, hidden by overgrown plants, is a locked door leading to underground service tunnels.
🗼 The Observatory (Highest Point)
An astronomical observatory on the Science Block roof. This is where the original portal to Nowhere Land was discovered twenty years ago. The dome formation will emanate from here at midnight.
The Seven Mysteries — Full Details
Each Mystery is a clue, a threat, and an opportunity. Players who investigate them gain crucial information about the gala's true purpose.
1. The Ghost of the Third Floor Bathroom
Origin: A female student who died in the first gala incident
Manifestation: Any player entering a bathroom alone sees a pale figure in the mirror—wearing their face, twenty years younger, mouth open in a silent scream. The reflection mouths words that can be lip-read: "Run. They're coming back."
Investigation Paths:
- Stay and watch (Drop + Umbra, Challenging): The reflection writes a name on the fogged mirror: "ASANO." Then it vanishes.
- Speak to the ghost (Drop + Reverie, Tricky): It whispers through the glass: "He tried to stop them. They pushed him through. Find the key."
- Touch the mirror (Drop + Forma, Easy): The mirror is ice-cold. Your hand leaves a print that slowly forms into a room number: 4-7.
Clue revealed: Professor Asano opposed the ritual and was pushed into Nowhere Land. Room 4-7 is his sealed laboratory.
2. The Moving Anatomical Model
Origin: A medical student who was the first sacrifice
Manifestation: The plastic skeleton in the biology lab is never where anyone left it. Sometimes it's at a desk, sometimes at the window, sometimes blocking the door. Its jaw moves when no one is looking.
Investigation Paths:
- Watch it without blinking (Drop + Anima, Very Challenging): You see it move—not walking, but teleporting between blinks. It points at a hidden drawer.
- Search the drawer it guards (Drop + Umbra, Tricky): Contains: autopsy photos from 20 years ago. Seven bodies. Cause of death: "Unknown dimensional trauma."
- Follow where it points (observation): It consistently points toward the observatory tower.
Clue revealed: Seven people died in the original gala. The observatory is the focal point.
3. The Piano That Plays Itself
Origin: A music student who played during the original ritual
Manifestation: At 11 PM, the music room piano plays a waltz—the same waltz from the original gala's program. The keys depress on their own, leaving frost where fingers would be.
Investigation Paths:
- Play along (Drop + Anima, Tricky): The ghost accepts your duet. As you play, sheet music appears on the stand—not music, but a ritual diagram.
- Interrupt the song (Automatic): The piano SLAMS shut. All lights in the room explode. A voice whispers: "She made us play until the end. Don't stop the music tonight."
- Record the melody (Technology check, Easy): Playing the recording backward reveals: "Midnight is the moment. The dome will seal. Find the shrine's silver."
Clue revealed: The ritual requires specific timing (midnight). The old shrine has significance to sealing/opening portals.
4. The Red Cape in the Pool
Origin: A swimming champion who drowned during the chaos
Manifestation: Something red floats in the pool after dark. When approached, it pulls the investigator in. The water is impossibly deep—far deeper than the pool's actual depth.
Investigation Paths:
- Get pulled in and survive (Drop + Forma, Challenging): You sink through impossible depths. At the bottom, you see an underwater door marked with the school crest—but inverted. You grab a key before swimming up. [ARTIFACT: Pool Key]
- Drain the pool (requires accessing maintenance): At the bottom: bones, and a waterlogged journal describing "the door beneath the water."
- Use the Pool Key (later): Opens a hidden passage beneath the primary school garden leading to underground service tunnels.
Clue revealed: Hidden passages connect the campus. The school was built with escape routes—or ritual paths.
5. The Thirteenth Step
Origin: A student council member who tried to flee
Manifestation: The main staircase has twelve steps. But after 9 PM, there are thirteen. Stepping on the thirteenth transports you—briefly—to twenty years ago.
Investigation Paths:
- Step on the thirteenth (Automatic vision): You see the first gala in progress. Students in formal wear. A speech being given. Then screaming. A purple-black dome forming. Blood. You're ripped back to the present.
- Bring an object to the thirteenth step (Drop + Reverie, Tricky): The object returns with a note attached, written in your own handwriting: "Don't trust the Deaness."
- Wait and observe who uses the step (Patience): You see cultist staff members using it to "report"—they vanish for seconds, then return with instructions.
Clue revealed: The original gala ended in violence. The Deaness is the threat. Time manipulation is possible here.
6. The Sealed Classroom (Room 4-4)
Origin: The ritual preparation chamber
Manifestation: Room 4-4 (四四, "death-death" in Japanese numerology) is always locked. But tonight, the door is ajar. Inside: desks arranged in a perfect circle, chalk symbols on the floor, and a sense of waiting.
Investigation Paths:
- Study the chalk symbols (Drop + Anima + Occult, Challenging): Ritual circle for "anchoring a domain breach." Seven positions marked. This was where the original sacrifices stood.
- Search the desks (Drop + Umbra, Easy): In one desk: a student's diary from 20 years ago. Final entry: "They said it was an honor to be chosen. I don't feel honored. I feel afraid."
- Wait in the room after 10 PM (Dangerous): Ghostly figures appear in the seven positions. They turn to look at you. One whispers: "You're early. The circle isn't complete. You could still run." Then they fade.
Clue revealed: Seven sacrifices are needed. The ritual has been prepared in advance. Running is still an option (before midnight).
7. The Teacher Who Never Left
Origin: Professor Asano Sion himself
Manifestation: In the faculty lounge, players glimpse a figure at the whiteboard—a man in a lab coat, writing equations. He's translucent, clearly not quite present. When he notices observers, he mouths one word: "RUN."
Investigation Paths:
- Copy the equations before they fade (Drop + Anima + Technology, Very Challenging): They're instructions for using the Sion Key to close portals.
- Call out to him (Drop + Reverie, Challenging): He solidifies briefly: "The key is in my lab. Room 4-7. The code is my daughter's birthday. Save them. Save yourself. I'm sorry I couldn't stop her."
- Return at midnight (Story progression): When the dome forms, Asano's ghost becomes fully visible. He can guide players to the Sion Key if they haven't found it, or provide tactical information about the Alptraumas.
Clue revealed: Professor Asano is still connected to this place. The Sion Key exists and can close portals. He opposes the Deaness.
Timeline: The Night of the Gala
Countdown Clock
The scenario runs on a timeline. Events trigger at specific times regardless of player actions, creating urgency and forcing choices.
🌅 6:00 PM — Arrival Phase
Players arrive at the campus gate. Long security lines. Opportunity to explore alternate entrances, reconnect with NPCs, case the environment.
GM: Establish normalcy. Seed unease. Let players choose their approach.
🥂 7:30 PM — Gala Begins
Doors open to the Central Auditorium. Opening speeches. Mingling begins. Players can visit various club parties across campus.
GM: Introduce key NPCs. Let players pursue Secret Goals. Drop first clues.
🔮 9:00 PM — The Warning Signs
Strange things begin happening. The Seven Mysteries manifest subtly. Alert players notice inconsistencies, nervous staff, unusual security patterns.
GM: Increase tension. Trigger 2-3 Mysteries based on player locations. Foreshadow danger.
⚡ 11:00 PM — The Seizure
Players are captured by their former colleagues (now revealed as cultists/servants). Brought to the main hall for the midnight announcement.
GM: This capture is NOT inevitable. Players who've been investigating may escape or prepare. Let their choices matter.
🕛 MIDNIGHT — The Revelation
The deaness reveals the truth. The Domain Dome forms. Portals open. Alptraumas emerge. The Soul Craze begins.
GM: Read the revelation speech dramatically. This is the scenario's turning point.
🌙 12:01 AM – 4:00 AM — Survival Phase
Players must survive, find escape routes, confront the source of the breach, and make their choice: enter Nowhere Land or seal the rift.
GM: Track Dome Willpower. Present multiple objectives. Let players prioritize.
Flexible Timeline: Player Agency
The Clock Is Not A Railroad
The timeline creates pressure, but player choices can alter events dramatically:
- If players discover the plot early (before 9 PM): They can warn other alumni, creating potential allies during the chaos. They might even attempt to sabotage the ritual before it begins.
- If players find the Sion Key before midnight: They can attempt to prevent the dome from forming entirely (requires reaching the observatory).
- If players are captured at 11 PM: This isn't a failure—it's a narrative beat. Give them opportunities to escape, gather information, or turn captors into allies.
- If players hide successfully: The dome still forms, but they start the survival phase in a position of their choosing rather than in the auditorium.
- If players attack the Deaness early: She has contingencies. The ritual proceeds with backup leaders, but she's distracted—creating openings elsewhere.
Pre-Generated Characters
These six alumni have shared history and pre-existing relationships. Each has a Secret Goal for the gala night— something personal they want to accomplish before midnight. These secrets should be given to players privately.
1. Sakamoto Hiro — The Golden Child
Former Student Council President | Current: Corporate Lawyer | Age: 38
The perfect student. Class valedictorian. Everyone's friend. Now a successful lawyer, but haunted by the things he pretended not to see.
- Forma: +2 | Anima: +3 | Umbra: +4 | Reverie: 3
- Key Skills: Persuasion, Insight, Lore (Law)
- Career: Advocate (1 rank)
Secret Goal: Apologize to someone he failed to protect twenty years ago—if they're still alive.
2. Tanaka Mei — The Rebel
Former Delinquent | Current: Tattoo Artist | Age: 37
Never finished her degree—expelled for fighting. But she was fighting for good reasons. Now she runs a successful tattoo parlor and still doesn't take anyone's shit.
- Forma: +4 | Anima: +2 | Umbra: +2 | Reverie: 4
- Key Skills: Brawl, Athletics, Craft (Art)
- Career: Artisan (1 rank)
Secret Goal: Find proof of what happened to her best friend who "transferred" twenty years ago.
3. Watanabe Kenji — The Quiet One
Former Invisible Student | Current: IT Consultant | Age: 38
Nobody remembers Kenji. He was there, but never seen. Perfect for someone who saw things they weren't supposed to. He's spent twenty years researching what really happened.
- Forma: +1 | Anima: +4 | Umbra: +1 | Reverie: 5
- Key Skills: Stealth, Investigation, Technology
- Career: Scholar (1 rank)
Secret Goal: Access the sealed records in the administrative building—proof of the cover-up.
4. Kobayashi Yuki — The Athlete
Former Track Star | Current: Physical Therapist | Age: 37
The fastest girl in school. Could have gone Olympic if not for the "accident." Now she helps others recover from injuries, while nursing her own scars—visible and invisible.
- Forma: +4 | Anima: +2 | Umbra: +2 | Reverie: 3
- Key Skills: Athletics, Medicine, Survival
- Career: Healer (1 rank)
Secret Goal: Confront Coach Ashima about what he did—and what he covered up.
5. Aoki Ren — The Artist
Former Art Club President | Current: Manga Artist | Age: 38
Always drawing, always observing, never quite fitting in. Ren's manga now has a cult following—and its supernatural elements are more autobiographical than anyone knows.
- Forma: +1 | Anima: +3 | Umbra: +3 | Reverie: 6
- Key Skills: Craft (Art), Insight, Performance
- Career: Visionary (1 rank)
Secret Goal: Find Satoshi Konda, the old janitor who inspired their art—and learn if he survived what he saw.
6. Nakamura Sora — The Teacher's Pet
Former Model Student | Current: High School Teacher | Age: 37
Returned to Nihongi to teach. Believes the institution can be saved from within. Increasingly realizes something is deeply wrong with the faculty.
- Forma: +2 | Anima: +3 | Umbra: +3 | Reverie: 4
- Key Skills: Lore (Education), Persuasion, Investigation
- Career: Mentor (1 rank)
Secret Goal: Find the current deaness's files on "special students"—and save any who might be targeted tonight.
Shared Memory: The Night They Never Discuss
What All Six Characters Witnessed (But Suppressed)
Twenty years ago, during their final year of primary school, all six characters were at a late-night school event (culture festival cleanup). They were together in the primary school garden when they saw:
- A purple-black light erupting from the observatory tower
- Screams from the main building, abruptly silenced
- Adults in formal wear running across the courtyard, some bleeding
- A teacher they recognized walking into the light and not coming out
- Men in black suits ordering everyone to "forget what they saw"
The next morning, school was cancelled. When it reopened, several teachers were "on leave." No one spoke of the incident. Over the years, the memory faded to a half-remembered nightmare.
Tonight, the Memory Returns:
When the dome forms at midnight, each character experiences a flash of recovered memory. Use this as a dramatic moment—suddenly, they all remember. And they remember that they were together when it happened.
Secret Goal Guidance (For GM)
How to Integrate Each Character's Secret Goal
Hiro (Apologize to someone he failed to protect):
The person is Yuki. Hiro witnessed Coach Ashima pressuring Yuki in an equipment room. He said nothing. Yuki doesn't know Hiro saw. Create a private moment where Hiro can confess—perhaps in the gymnasium, near the equipment room.
Mei (Find proof about her best friend who "transferred"):
Her friend, Akira, was one of the seven sacrifices. Evidence exists in the sealed administrative records (requires breaking in) or in Satoshi's manga journals (he witnessed everything).
Kenji (Access sealed records proving the cover-up):
The records are in the Deaness's office, behind a biometric lock. Kenji can find the override code in Professor Asano's lab, or social-engineer access from a cultist staff member.
Yuki (Confront Coach Ashima):
Ashima is at the gymnasium party, surrounded by former athletes. Yuki needs to isolate him—or confront him publicly. Either way, he'll try to intimidate her. If she stands firm, other athletes may reveal they had similar experiences.
Ren (Find Satoshi Konda):
Satoshi is living in a maintenance shed at the campus edge. He's been waiting for someone to believe him. Finding him early gives players a crucial ally with knowledge of the campus, the ritual, and the Alptraumas.
Sora (Find the "special students" list and save them):
The list is on the Deaness's desk. Seven names—tonight's sacrifices. Sora recognizes some: current students she's taught. They're being held in the sealed classroom (Room 4-4). Rescuing them before midnight can disrupt the ritual.
Key NPCs

Professor Asano Sion — The Mad Genius
Former Technology Professor | Status: Missing (Presumed Dead)
A brilliant but eccentric professor obsessed with "liminal spaces" and the intersection of technology and mysticism. He was the one who discovered the portal at the observatory twenty years ago. Officially, he died in a "laboratory accident." In truth, he stepped through the portal and never returned.
Features:
- PASSIVE — Technological Mystic: Left behind encrypted research notes scattered across campus
- SECRET — Still Alive: He may appear through a portal at midnight, changed by his time in Nowhere Land
- ARTIFACT — The Sion Key: A device that can stabilize or close portals (hidden in his old lab)
He used to say the walls between worlds were thin here. We thought he was crazy. He was right.
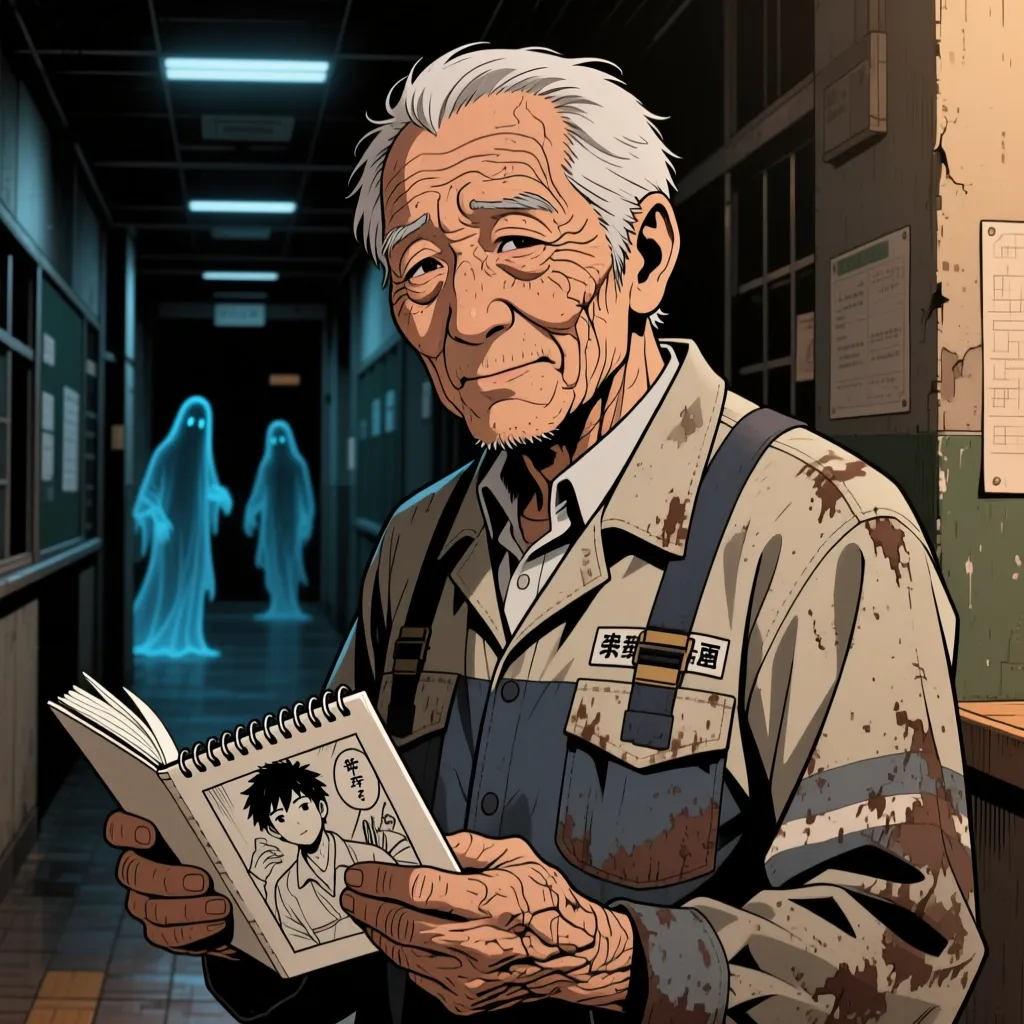
Satoshi Konda — The Ghost Seer
Former Janitor | Status: Retired, Living on Campus Outskirts
The old janitor who always claimed to see ghosts. Students mocked him. Teachers ignored him. But Satoshi has always been able to see the edges of Nowhere Land bleeding through—and he's documented everything in his manga-style journals.
Features:
- PASSIVE — Ghost Sight: Can see Alptraumas and portals before they fully manifest
- ACTION — Warning Drawings: His manga pages serve as maps of danger zones
- ALLY POTENTIAL: Will help players if they believe him (finally, someone who listens)
I've been drawing them for twenty years. The things that live in the walls. Tonight, they're coming through.
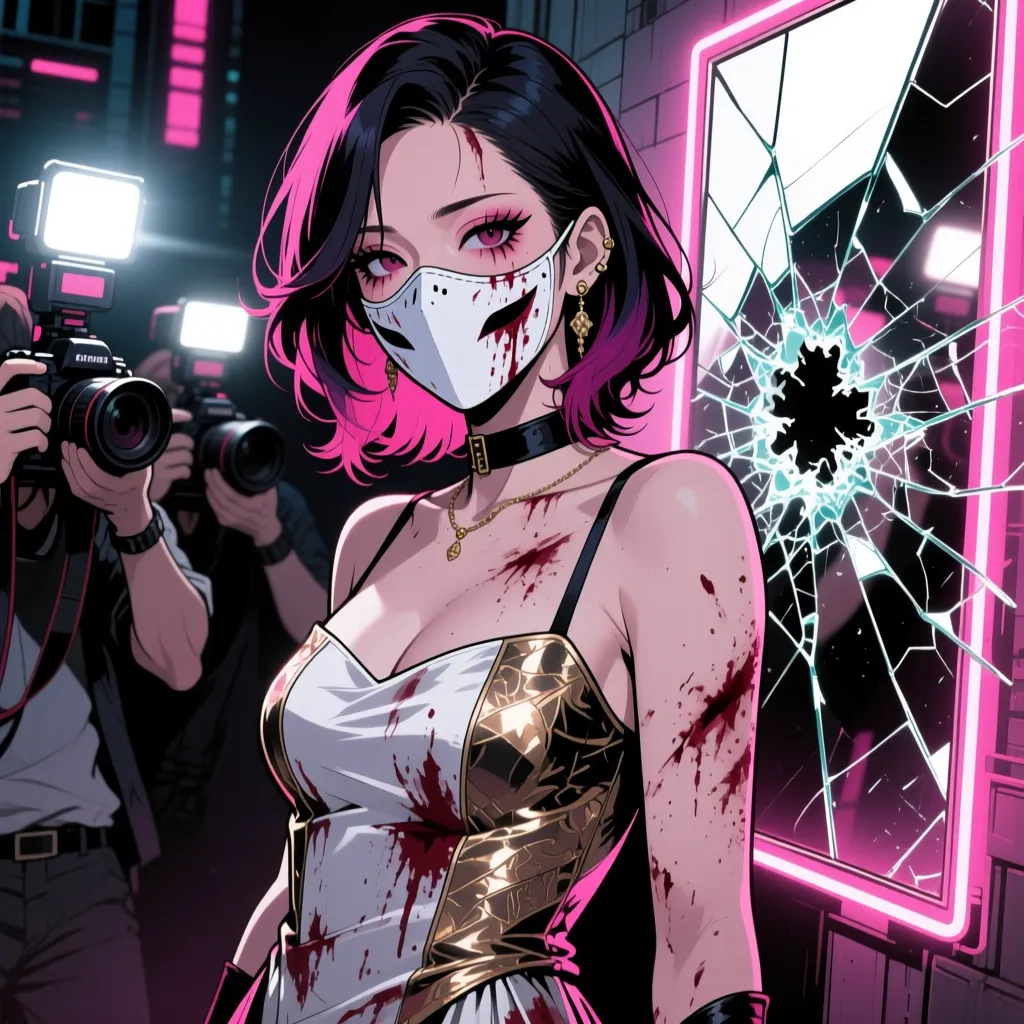
Mina Nikagawa — The Fallen Idol
Former Gyaru / Current: Faded Celebrity | Age: 37
Once the most popular girl in school, Mina went on to become a famous idol—until scandals and age caught up with her. Her rise to fame was no accident: she made a deal twenty years ago, agreeing to stay silent about the gala tragedy in exchange for supernatural charisma and industry connections.
Features:
- PASSIVE — Faded Glamour: Advantage on first impression, Disadvantage on deeper scrutiny
- IMMUNITY — Already Broken: Alptraumas don't attack her—she's already experienced deep trauma
- POTENTIAL REVENANT: If pushed too far, she may become a vessel for something darker
- ARCHETYPE — Tsundere: Cold and dismissive at first, vulnerable beneath the mask
They promised me stardom. They didn't mention the cost. And now... I can't remember what I traded away.
Koji Ashima — The Predator
Sports Coach | Status: Still Employed (Reinstated)
A former Olympic athlete who became a coach. His history of abuse was quietly covered up—he was "transferred" for a few years, then reinstated when the scandal faded. He's now deeply involved in the cult running the school, providing them with "candidates" from his athletes.
Features:
- TYPE: NPC - Antagonist | Tier: Standard
- PASSIVE — Predator's Instinct: Advantage to identify vulnerable targets
- ACTION — Intimidation: Drop + Umbra attack dealing Anima damage
- REACTION — Institutional Protection: Can call security if threatened publicly
Content Note: Ashima's abuse is referenced but never depicted. He exists as an obstacle and target for justice, not for exploitation.
Confrontation Mechanics
If confronted privately: Ashima threatens, then offers a bribe. If refused, he becomes violent (but is careful not to leave marks).
If confronted publicly: He laughs it off, then works to isolate and silence the accuser. Other former athletes may step forward—or may be too afraid.
If attacked: He fights back viciously. Stats: Forma +4, Brawl expertise. But he's also a coward—if seriously hurt, he flees toward security.
During the Soul Craze: Ashima tries to hide in the gymnasium equipment room. The Alptraumas prioritize him—his sins have attracted their attention. Players can choose to save him (gaining a reluctant, terrified ally) or let the entities take him.
Secondary NPCs (Roleplay Opportunities)
These characters provide roleplay opportunities and potential clues. Use them to flesh out the school environment and create memorable interactions.
🍶 Yamamoto Takeshi — The Drunk Alumni
Former class clown, now a middle-manager drowning his disappointments. He was at the first gala as a teenager and saw things. Alcohol loosens his tongue.
Remember the '04 gala? The one that got cancelled? No one remembers... but I saw the lights. The screaming. They paid my parents to forget.
Wants to drink, wants to forget, but can't quite manage either.
📋 Suzuki Mariko — The Anxious Administrator
School administrator who's been here for 25 years. She knows the Deaness's secrets but is terrified to speak. Her hands shake when she sees the sealed records.
If befriended, she might slip a player a keycard "by accident" or warn them to "leave before the speeches end."
Survival. She's complicit but not committed. Could be turned.
🎭 Hayashi Daisuke — The Former Bully
He made Mei's life hell in high school. Now he's a nervous wreck, clearly experiencing delayed remorse. He keeps apologizing to people at random.
Something's wrong tonight. I can feel it. The same feeling as before... when Akira disappeared. I didn't mean for her to—I didn't know—
Seeking forgiveness. Willing to help to atone.
👔 Tanaka Ryuichi — The Security Chief
Head of the unusually heavy security. Former yakuza, now "legitimate." He takes orders from the Deaness directly. Loyal but not ideological—he's in it for the money.
His radio frequency reveals coded communications about "guests to be contained" and "preparation of the circle."
Getting paid. If the money's not worth his life, he might cut his losses.
NPC Reaction Tables (Roll or Choose)
When players interact with NPCs, use these reactions based on the NPC's role:
Innocent Alumni (d6):
- 1-2: Nostalgic and friendly, happy to reminisce (potential ally)
- 3-4: Distracted by their own drama (romantic tension, career anxiety)
- 5: Nervous, keeps checking the exits (subconsciously sensing danger)
- 6: Directly helpful—shares a rumor, offers assistance, remembers something useful
Complicit Staff (d6):
- 1-2: Overly friendly, trying to keep players in designated areas
- 3-4: Dismissive, brushing off concerns as "renovation work" or "electrical issues"
- 5: Slip-up—mentions "the guests for tonight" or "the special event"
- 6: Actively hostile if players probe too deep—escalates to security
Cultist Inner Circle (d6):
- 1-2: Serene, almost evangelical about "what's coming"
- 3-4: Watching players with predatory interest
- 5: Attempts to recruit: "You could be part of something greater"
- 6: Already moving to contain the player—calls for backup
Deaness Ishikawa Reiko — The Architect
Current University Deaness | Age: 55
The new deaness, appointed five years ago. Charming, politically connected, and absolutely ruthless. She's the one who orchestrated tonight's "reunion"—a ritual twenty years in the making. The original gala was a failed attempt; tonight is the perfected version.
Features:
- TYPE: NPC - Boss | Tier: Elite
- PASSIVE — Institutional Power: Commands all staff; word is law on campus
- ACTION — Midnight Announcement: Triggers the Domain Dome formation
- RITUAL — Soul Harvest: Uses Alptraumas to collect "candidates" for Nowhere Land entities
- WEAKNESS: The ritual requires her to remain at the central point—she can't flee
"Welcome home, everyone. You've all been chosen. Isn't that wonderful?"
The Domain Dome: Alptraumas Incursion
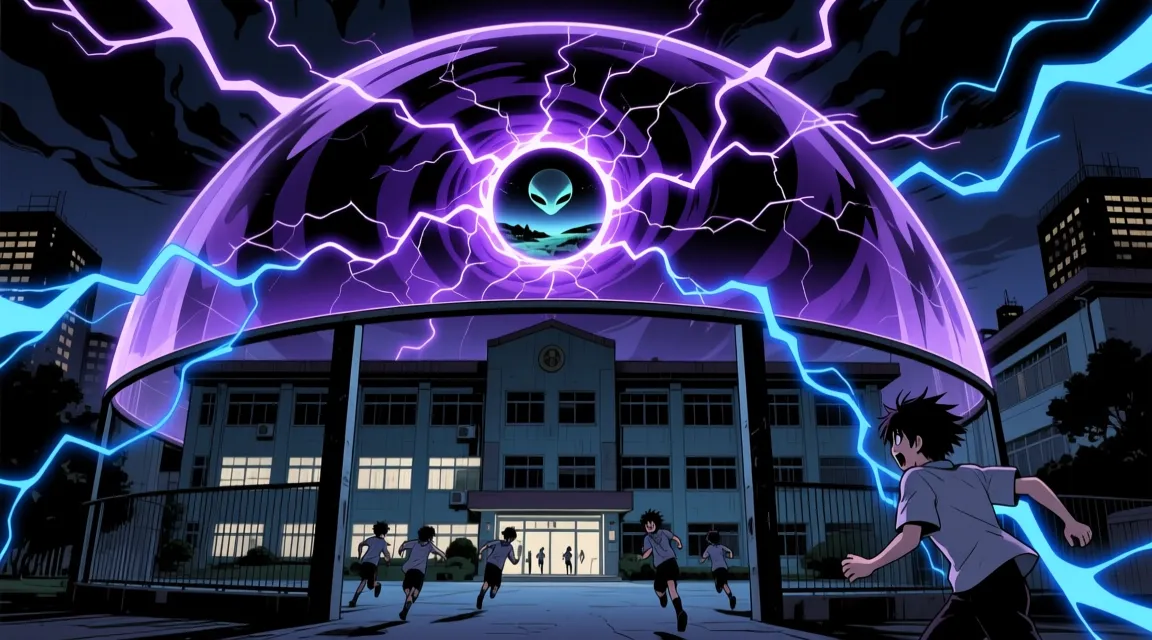
Environment: The Domain Dome
Type: Bleeding Domain | Difficulty: Challenging | Willpower: 6 (Rising)
At midnight, a dome of dark energy forms over the campus, emanating from the observatory at the highest point. This is a Bleeding Domain—not a full domain incursion, but Nowhere Land bleeding through a weakened barrier. Inside the dome, the rules of reality begin to bend.
PASSIVE FEATURES:
- Sealed Perimeter: The dome is invisible and intangible. Anyone trying to leave is "bounced back" 50 feet, finding themselves where they started. Electronics fail. Phone signals die. No one outside can see inside.
- Reality Bleed: The Seven Mysteries become real and active. Ghosts manifest. Impossible geometry appears in corridors.
- Potential Surge: Characters with high Reverie begin sensing things. Drop + Reverie (Tricky) to perceive portals forming.
- Trauma Resonance: Past traumas become visible as shadowy overlays. Bullying victims see their tormentors' faces superimposed on others. Perpetrators see their victims everywhere.
ACTIONS (Dome triggers 1-2 per scene):
- Portal Eruption: A new portal opens, releasing 1d4 minor Alptraumas. Locations: random building, always dramatic.
- Memory Overlay: A scene from twenty years ago plays out in ghostly form. Clue delivery mechanism.
- Reality Glitch: Corridors rearrange. Rooms connect to wrong places. Navigation checks required.
ALPTRAUMAS (Domain Entities):
- Minor Alptrauma — Bully's Echo: Shadowy figures that replay acts of cruelty. Attack Anima. Vulnerable to being confronted.
- Standard Alptrauma — The Forgotten: Entities made of the ignored and overlooked. Attack Umbra. Vulnerable to being acknowledged.
- Elite Alptrauma — The Cover-Up: A massive entity made of suppressed documents and silenced voices. Attack all Essences. Vulnerable to truth.
WEAKENING THE DOME (Required for Escape):
- Destroy the central ritual focus: Observatory equipment → Willpower -2
- Kill or incapacitate the Deaness: Breaks her concentration → Willpower -2
- Use the Sion Key: Professor Asano's device → Willpower -3
- Confront and resolve a major trauma: Personal healing → Willpower -1 per player
- At Willpower ≤ 2: The dome begins to collapse. Escape becomes possible.
Alptrauma Bestiary
Entities from the Domain of Torture
Minor Alptrauma — The Bully's Echo
Tier: Minor | HP: 6 | Forma +1 | Umbra +3
Shadowy humanoid figures that replay acts of cruelty. They wear the faces of people who hurt you, speak in their voices, repeat the worst things ever said to you.
- PASSIVE — Mirror of Shame: Targets who look directly at an Echo see someone who hurt them. First encounter: Drop + Anima (Tricky) or be stunned for 1 round.
- ACTION — Cruel Words: Psychic attack dealing Anima damage equal to the target's own Umbra score.
- WEAKNESS — Acknowledgment: If a character directly confronts the trauma represented ("I see you. You don't control me anymore."), the Echo takes 4 damage and cannot attack that character this round.
Standard Alptrauma — The Forgotten
Tier: Standard | HP: 12 | Forma +2 | Umbra +2 | Anima +3
Entities made of the ignored and overlooked. They appear as people no one remembers—faces that slide out of memory, voices that don't register. They feed on isolation.
- PASSIVE — Forgettable: Characters must make Drop + Anima (Challenging) to notice The Forgotten until it attacks. Even allies may forget someone is in danger.
- ACTION — You Never Saw Me: Target one character. They forget one ally for the next round—that ally becomes invisible and inaudible to them.
- ACTION — Consume Recognition: Grapple attack. On success, target loses their name for 1 hour. NPCs don't recognize them. Other players remember, but feel uncertain.
- WEAKNESS — Direct Acknowledgment: Calling The Forgotten by name (any name—give it one) deals 6 damage. Making eye contact and saying "I see you" prevents all its abilities for 1 round.
Elite Alptrauma — The Cover-Up
Tier: Elite | HP: 25 | Forma +3 | Umbra +4 | Anima +4
A massive entity made of suppressed documents, silenced voices, and sealed records. It appears as a towering figure wrapped in official paperwork, stamps, and redaction marks. Mouths open and close across its surface, trying to speak truths that emerge only as static.
- PASSIVE — Official Denial: Any attempt to describe The Cover-Up to someone who hasn't seen it fails. Words come out wrong. Recordings become static.
- PASSIVE — Weight of Secrets: Characters within 30 feet feel pressure to stay silent. Drop + Anima (Challenging) to speak about anything incriminating or secret.
- ACTION — Redact: Target one character. Their next statement is erased from everyone's memory, including their own. (1/encounter)
- ACTION — Bury the Evidence: All documents, phones, and recording devices within 50 feet are destroyed. Physical evidence becomes illegible.
- REACTION — Suppress Testimony: When someone attempts to reveal a truth, The Cover-Up attacks that speaker for 4 Anima damage.
- WEAKNESS — The Truth: Each time a character successfully reveals a hidden truth about the school's history to a new person, The Cover-Up takes 5 damage and cannot use Redact that round.
This entity should be fought through narrative—by uncovering and spreading the truth about what happened 20 years ago, not through direct combat.
Boss Alptrauma — The Anniversary
Tier: Boss | HP: 40 | Forma +4 | Umbra +5 | Anima +3 | Reverie +4
The culmination of 20 years of preparation. A living memory of the original tragedy, grown powerful from anticipation. It appears as a shifting mass of formal wear, celebration decorations, and screaming faces—a gala gone horribly wrong, frozen at the moment of catastrophe.
- PASSIVE — Temporal Loop: The Anniversary replays moments from the original gala. Characters caught in its presence may experience flashbacks, losing their action as they relive the past.
- PASSIVE — Anniversary Immunity: Cannot be damaged by anything that wasn't present at the original gala (modern weapons, technology invented after 2004).
- ACTION — Repeat History: Forces one character to reenact a traumatic moment from their past. They must make Drop + Reverie (Very Challenging) or act out the memory, unable to take other actions.
- ACTION — The Invitation: Extends a formal invitation card. Target must make Drop + Anima (Epic) or feel compelled to "attend" the original gala—walking toward the observatory in a trance.
- SPECIAL — Twenty-Year Countdown: Every 4 rounds, The Anniversary grows stronger (+1 to all stats) as midnight's echo intensifies.
- WEAKNESS — Prevent the Recurrence: If the current sacrifice (seven current students) is freed, The Anniversary loses half its HP. If players create a new, positive memory here ("We won't let history repeat"), it takes 10 damage per character participating.
- WEAKNESS — Professor Asano: If Asano's ghost confronts The Anniversary directly, both are locked in combat—giving players time to act without interference.
Act Structure
Act 1: Arrival (6:00 PM - 7:30 PM)
Scene Goals: Establish characters, introduce NPCs, explore campus, build tension
Players arrive at the campus gate. Security is tight—too tight. Long lines form as guards check IDs meticulously. The official explanation is "after the incident last time," but nobody remembers any previous gala.
The midsummer air is thick with humidity as you approach Nihongi University for the first time in years. Lanterns line the pathways, cherry blossom petals drift in the evening breeze, and the familiar silhouette of the main building rises against the sunset. Somewhere, a school bell rings—impossibly, since it's evening— and for a moment, you're eighteen again, walking these paths with friends and fears you thought you'd left behind. A line of guests stretches from the main gate, moving slowly as security guards check each arrival with unusual scrutiny. Some faces in the crowd are familiar. Some should be familiar but aren't. And some... some shouldn't be here at all.
PLAYER OPTIONS:
- Wait in Line: 30 minutes. Opportunity to reconnect with NPCs, gather gossip, observe security patterns.
- Use an Alternate Entrance: Players remember old shortcuts. Drop + Umbra (Challenging) to sneak through the garden gate.
- Investigate the Security: Drop + Anima (Tricky) to notice guards are checking against a second, hidden list.
- Confront a Familiar Face: An old friend or enemy appears. Roleplay opportunity, potential ally or warning.
CLUE SEEDING (3-Clue Rule):
- Clue A: A drunk alumni mentions "the last gala that got cancelled" twenty years ago
- Clue B: Security guards have earpieces connected to something beyond campus systems
- Clue C: The new deaness's photograph in the welcome brochure shows her wearing the same pendant as the old dean—from 1990s photos
ENVIRONMENTAL DETAILS (Show, Don't Tell):
- Cherry blossoms are blooming—but it's midsummer. They shouldn't be.
- The school bell rings at irregular intervals, each time making guests briefly confused about what year it is.
- Old photographs on the welcome display have been altered—certain faces blurred or removed.
- A maintenance worker is painting over graffiti. If players look, it reads: "THEY'RE STILL HERE"
Act 1 Encounter: The Gate Choice
BRANCHING PATHS (Player-Driven)
Path A: Through the Main Gate (Social Route)
Players wait in line, interact with returning alumni, gather gossip. They're processed "normally" but may notice their names being checked against a secondary list marked with red ink.
Meet Yamamoto Takeshi (drunk alumni) who rambles about the "cancelled gala."
Cultist staff now know exactly who's arrived and where they're going.
Path B: Garden Gate (Stealth Route)
Old shortcut through the primary school garden. Overgrown but passable. Players avoid the main security check but may encounter Satoshi Konda, who's been watching the garden for years.
Early meeting with Satoshi—he can provide warnings and his manga journals.
Drop + Umbra (Challenging). Failure means discovery by a cultist groundskeeper.
Path C: Service Road (Investigation Route)
The delivery entrance used by catering trucks. Players can observe preparations, overhear staff communications, and access the underground tunnels—but it's actively patrolled.
Intercept a radio communication about "preparing the circle" and "the seven guests of honor."
High security presence. Combat or capture likely if detected.
Act 2: The Gala (7:30 PM - 9:00 PM)
Scene Goals: Explore campus, pursue Secret Goals, encounter NPCs, discover clues
The gala is in full swing. The main auditorium hosts the official event, but parties are happening across campus— each club hosting their own reunion in their old spaces. This is the "sandbox" portion where players can split up and explore.
LOCATION-SPECIFIC EVENTS:
Main Auditorium — The Official Party
Speeches, toasts, networking. The deaness gives a welcoming address (foreshadowing). Mina Nikagawa is here, being hounded by former fans.
The Deaness's speech mentions "honoring those we lost" while looking directly at seven empty seats reserved at the front.
Art Club Room — The Creatives
Old artwork still hangs on walls. One painting depicts the Seven Mysteries. Satoshi Konda lurks nearby, sketching.
A 20-year-old painting shows the observatory with a purple light emerging—dated two weeks before the first gala.
Gymnasium — The Athletes
Coach Ashima is holding court. Some former athletes look uncomfortable. The equipment room door is locked—but players might remember the key's hiding spot.
Yuki's confrontation with Ashima can happen here. Other athletes may support her—or be too afraid to speak.
Science Block — The Seekers
Professor Asano's old lab is sealed with crime scene tape (twenty years old, faded). The door to the rooftop observatory is locked—requires a keycard from administration.
Asano's nameplate is still on the door. Through the window, players can see his research notes still scattered on the desk.
Library Archives — The Researchers
Old yearbooks. Newspaper clippings. With a Hard check, players find a folder misfiled: "GALA INCIDENT REPORT - SEALED BY ORDER OF MAYOR"
Kenji's quest for sealed records can begin here. The folder contains partial information—full records are in the Deaness's office.
NPC ENCOUNTERS (Roll or Choose):
- A former bully, now a nervous wreck, begs forgiveness and warns "something's wrong tonight"
- Satoshi Konda approaches a player, presses a manga page into their hand: "When the lights go out, follow the ghost"
- Mina Nikagawa corners a player: "You're investigating, aren't you? I can tell. Don't. Please. For your own sake."
- Coach Ashima notices a player watching him: "You look familiar. Were you one of mine?" (Threatening subtext)
- A security guard drops their radio—it's tuned to a frequency playing eerie chanting
- An elderly janitor (not Satoshi) walks past and says: "They're in the walls. They've always been in the walls."
Act 2 Sandbox: Location Details
Each Location as a Mini-Encounter
Main Auditorium — Detailed
The heart of the gala. Formal atmosphere, 200+ guests, catering staff circulating.
- Guest list visible. Players can check who was invited—and who wasn't on the "official" list but is here anyway.
- 20 years of alumni photos. Some faces have been subtly altered or removed. Drop + Anima (Tricky) to notice.
- She sits at the head, surrounded by inner circle cultists. She makes eye contact with each PC at some point—a knowing look, as if she's been waiting for them.
- Reserved seating at the front, conspicuously empty. Placards read names—if players investigate, they recognize them as current students (tonight's sacrifices).
- Staff entrance leads to service corridors and eventually the underground tunnels.
- She's performing her "celebrity" role but her eyes are dead. If approached privately, she drops hints about "the deal I made" but won't elaborate. She knows something is coming and has accepted it.
- "We are all returning to where we began. How fitting that we should celebrate twenty years of... transformation. Tonight, we complete what was started. Tonight, we honor those who gave everything for this institution."
Science Block / Asano's Lab — Detailed
The heart of the mystery. Professor Asano's sealed laboratory holds the Sion Key.
- Drop + Umbra (Challenging). The lock is old but reinforced.
- Asano's daughter's birthday (06-15-1994). Clue available from: asking the Ghost (Mystery 7), finding Asano's old faculty file, or remembering (if a PC was in his class).
- Drop + Forma (Very Challenging). Loud. Alerts security in 2 minutes.
- Obtained from Suzuki Mariko (nervous admin) or the Deaness's office.
- Scattered across the desk. Equations about "dimensional membrane permeability" and "anchor points for cross-planar stabilization."
- A device resembling a crystal-topped tuning fork. Instructions for use are encoded in the notes (Drop + Anima + Technology, Hard to decipher).
- Photos of Asano with his family, with students, with the original Dean. A resignation letter, never sent: "I cannot be party to what you're planning. The portal must be sealed, not opened."
- Behind a bookshelf (Drop + Umbra, Easy to find if searching). Contains: a map of the underground tunnels, a second Sion Key prototype (damaged but could be repaired), and a letter to "whoever finds this" explaining how to close the portal permanently.
Underground Tunnels — Detailed
Service passages connecting all campus buildings. Originally built for maintenance; now used by cultists.
- Old school equipment, ritual supplies (candles, chalk, robes), caged animals for sacrifice (distressing but non-graphic).
- Where the seven current students are being kept. Guarded by two cultists. Players can attempt rescue before midnight.
- A Shinto shrine that was supposedly demolished when the school expanded. It wasn't—it was moved underground. The barrier between worlds is thinnest here. Hallowed ground that hurts Alptraumas.
- Previous victims left messages. "DON'T TRUST THE TEACHERS." "THE PORTAL OPENS AT MIDNIGHT." "ASANO WAS RIGHT."
- 2-4 staff members in black robes, making rounds every 15 minutes.
- A Standard Alptrauma has leaked through early. It stalks the tunnels, feeding on isolation.
- Near the old shrine. Maps, drawings, 20 years of observations. If players haven't found him yet, he's here.
Act 3: Warning Signs (9:00 PM - 11:00 PM)
Scene Goals: Escalating horror, Seven Mysteries manifest, players pursue goals, tension builds
The Alptraumas are stirring. The barrier weakens as midnight approaches. The Seven Mysteries activate in sequence— each one a warning that something is coming. NPCs start acting strangely. The gala atmosphere shifts from celebration to dread.
Each mystery triggers in sequence from 9 PM onward. Players who investigated them earlier have advantage— they understand what's happening. Those who didn't are caught off guard.
9:00 PM — The Vanished Step Activates
A guest disappears on the staircase. Their scream echoes but they're nowhere to be found. If players know the truth, they can guide others to safety. If not, another guest disappears.
Each vanished guest adds 1 Spectral Husk to the midnight encounter.
9:30 PM — The Beckoning Light Activates
Purple light pulses from the observatory. Guests who see it feel compelled to climb. Security tries to contain the situation but they're also affected.
Drop + Anima (Challenging) to resist the compulsion. Each player who climbs must be rescued or joins the cultist gathering.
10:00 PM — The Wet Footprints Appear
Footprints manifest throughout the building. They lead from the pool to the underground entrance. Following them reveals the tunnel access—but also encounters the Drowned Memory Alptrauma.
Players can avoid, sneak past, or fight the Standard Alptrauma.
10:30 PM — The Bathroom Mirror Calls
Anyone who looks into a mirror sees their reflection delay—then mouth words. "THE PORTAL OPENS AT MIDNIGHT." "SEVEN WILL DIE." "YOU CAN STILL SAVE THEM."
The reflections know the truth and try to communicate, but their messages are fragmented and disturbing.
11:00 PM — The Doll Collection Animates
Every doll and mannequin in the building begins to move. Not aggressively—they're pointing. All pointing toward the underground tunnels. If destroyed, they reassemble.
This is the final warning. The way to the ritual site is revealed to all.
- At 10:00 PM: The main lights flicker. Emergency lighting activates. Some guests begin leaving—but security turns them back.
- At 10:30 PM: A scream echoes from somewhere. Security rushes to contain it. "Technical difficulties. Please remain calm."
- At 10:45 PM: Phone signals die. WiFi fails. The outside world ceases to exist.
Act 3: NPC Developments
Major NPCs have their own arcs during this act. Their behavior changes as midnight approaches.
The Deaness (Yukiko Hayashi)
As the mysteries activate, she drops her public facade. She's now openly directing staff—who are clearly cultists.
- Please remain calm. This is all part of the evening's entertainment.
- Security starts "escorting" certain guests to the underground. She oversees, smiling.
- She announces: "The reunion is moving to a more... intimate venue. Your cooperation is appreciated." Those who resist are sedated by cultist staff.
If players confront her directly, she offers a deal: "Join us willingly, and I'll spare someone you care about. The Domain needs witnesses, not just victims."
Satoshi Konda
The janitor's moment of truth. He's been waiting 20 years for allies.
- If players found him early: He guides them through the tunnels, pointing out dangers, showing safe routes.
- If players ignored him: He finds them during Act 3, desperately offering help: "I know you don't trust me. But I know how to stop this."
- His sacrifice: Satoshi is willing to die to end this. If players let him, he can distract the boss-level Alptrauma during the finale—giving them crucial action economy.
Coach Ashima Kotetsu
The inner circle cultist who doesn't believe until it's too late.
- 9:00 PM: Still performing his "beloved mentor" act, but he's nervous. He knows something's coming but believed the ritual was just symbolism.
- 10:30 PM: Reality hits. He sees an Alptrauma consume a former student. His worldview shatters.
- 11:00 PM: 11:00 PM: Fight or flight. He either:
- Breaks: Runs, potentially trampling others to escape. A coward to the end.
- Redeems: If Yuki confronted him AND he feels genuine remorse, he can become an ally—using his inside knowledge to help.
Mina Nikagawa
The celebrity with a death wish finally finds a reason to live—or doesn't.
- 9:00 PM: She's drinking heavily, muttering about "finally ending it."
- If players reach out: She reveals her deal: "I sold something to the Domain to become famous. Tonight, I pay in full." She believes she's doomed.
- Her choice: If players give her hope—genuine connection, a reminder of who she was before fame—she can join them. Her celebrity status means she can rally other alumni as a distraction.
- If ignored: If ignored: At 11:30 PM, she walks willingly toward the underground. Adding herself to the sacrifices.
Act 4: The Seizure (11:00 PM - MIDNIGHT)
Scene Goals: Capture attempt, revelation, player agency in response, midnight confrontation
The cultists make their move. But players aren't helpless—their preparation during Acts 2-3 determines whether this is a "capture sequence" or a "desperate escape." This act is about player agency in the face of overwhelming odds.
If Players Prepared (3+ Clues Found):
They saw this coming. The capture attempt fails. They can:
- Flee to the tunnels (they know the entrance locations)
- Hide in a "safe" location (the old shrine, Satoshi's hideout)
- Turn the tables—ambush the cultists instead
- Proceed to the observatory before midnight strikes
If Players Partially Prepared (1-2 Clues):
Some are captured, some escape. Split the party:
- Captured players are brought to the holding cells (rescue opportunity)
- Free players must choose: rescue their friends or pursue objectives
- The midnight announcement happens—but with witnesses watching
If Players Unprepared (0 Clues):
Full capture. But all is not lost:
- They wake in the holding cells as the ritual begins
- They witness the midnight announcement from the crowd
- Escape is harder but possible—they just have less time
Act 4: The Betrayal Sequence
The cultists reveal themselves. Here's how to run the capture attempt:
TRAITOR NPCs (Choose 2-3 from Earlier Interactions):
Select NPCs the players interacted with positively. The betrayal stings more.
- Suzuki Mariko (Admin): "I'm sorry. I have a daughter. They said they'd take her if I didn't..."
- Dr. Tanaka (Nurse): "The injections are painless. You won't even remember agreeing."
- Security Guard Nakamura: Silent. Professional. Just doing his job—which is now restraining players.
- Hayashi Daisuke (Bartender): "Should have accepted that drink. It had something to help you sleep through this."
CAPTURE MECHANICS:
If the capture happens, run it as a combat encounter the players are meant to lose—unless they're brilliant.
- Opposition: 2 cultists per player + 1 Elite Alptrauma manifesting in shadows
- Terrain: Cultists know the building; players suffer -1 to navigation checks
- Escape Routes: 3 exits, each guarded by 1 cultist. Breaking through requires Drop + Forma (Challenging)
- Sedation: Cultists have syringes. If a player is Grappled, they can be sedated next round (Drop + Umbra, Tricky to resist)
Victory Condition: If players defeat or evade 50% of cultists, the rest fall back to "let them run into the monsters."
IF CAPTURED — The Holding Cells:
Underground. Cold. Other captives here—including the seven current students marked for sacrifice.
- Cell Layout: Individual cells with barred doors. One guard patrols every 5 minutes.
- Escape Method 1: Pick the lock (Drop + Umbra, Hard). Takes 3 rounds.
- Escape Method 2: Bribe the guard (a cultist having second thoughts). He lets them out but won't fight.
- Escape Method 3: Wait for midnight chaos. When the dome forms, the guard runs to join the ritual. Cells are unguarded.
- The Students: Seven teenagers, terrified. If freed, they become civilians the players must protect—or abandon.
The Midnight Announcement
This happens whether players are captured or free. If free, they witness from hiding. If captured, they're in the crowd.
The deaness stands at the podium, bathed in spotlight. Behind her, a screen displays the Nihongi crest— but it's wrong. The emblem pulses with unnatural light. Purple veins spread across the projected image. "Welcome, family," she says, her smile too wide. "You've all been chosen. Selected. Cultivated. For twenty years, we've watched you grow. Nurtured your fears. Harvested your potential. Now, it's time to reap what we've planted." She raises her hands. The lights die. Every light in the building—emergency included—goes dark. Then the dome forms overhead—a visible shimmer of purple-black energy sealing the campus from the outside world. The sky beyond is wrong. Constellations that don't exist. A moon that's too close. Portals tear open across the auditorium. Not gentle doors—violent ruptures in reality. Shapes begin emerging. Alptraumas. Hungry. Patient. Smiling. "Welcome to the Soul Craze," the Deaness says, stepping down from the podium as an Elite Alptrauma rises behind her. "Run if you like. It makes the hunt more interesting."
- Chaos: Guests scream and flee. 200+ panicking civilians. Stampede danger (Drop + Forma, Easy to avoid being trampled).
- Alptrauma Emergence: 2d6 Standard Alptraumas emerge from portals. They don't attack immediately—they stalk, savoring fear.
- Cultist Actions: They don't flee. They move to block key exits, direct certain targets toward Alptraumas.
- The Deaness: She retreats toward the observatory. If players try to follow, the Elite Alptrauma blocks them.
- Window of Opportunity: For 10 minutes, the chaos creates cover. Players can escape the auditorium, gather allies, or pursue objectives. After 10 minutes, Alptraumas begin active hunting.
Act 5: The Soul Craze (MIDNIGHT - 4:00 AM)
Scene Goals: Survival, confrontation, resolution, choice
The final act is a survival sandbox. Players must navigate the transformed campus, gather allies, find the means to weaken the dome, and ultimately choose their fate. This is the "final dungeon" where everything they've learned comes together.
Reality has shifted. The school is now a Domain—halfway between the mundane world and Nowhere Land.
- Corridors Rearrange: Hallways that were straight now curve. Stairs lead to different floors than expected. Navigation requires Drop + Anima (Tricky).
- The Rules Change: Running in the hallways causes them to elongate. Whispering draws Alptraumas. Closing your eyes makes you invisible to lesser creatures.
- Thin Spots: Some areas are more "real" than others. The old shrine is Hallowed Ground (safe). The observatory is Ground Zero (extremely dangerous).
- Time Flows Wrong: Hours might pass in minutes, or vice versa. The ritual completes at 4:00 AM—players feel this deadline in their bones.
Objective: Find the Sion Key
Hidden in Professor Asano's sealed lab. The lab is now guarded by a Sentinel (Elite Alptrauma).
Method 1: Break in (Drop + Forma, Hard) — Loud, alerts patrol
Method 2: Find the old keycode from Asano's ghost in the faculty lounge (Drop + Umbra, Easy if they spoke to his ghost)
Method 3: Satoshi has a copy—but only shares it if players earned his trust
Objective: Reach the Observatory
The dome's origin point. The Deaness is here, channeling the ritual. Heavily guarded.
Guardians: 1 Collector (Boss) + 2d4 Spectral Husks (Minor)
Approach: Rooftop access from Science Block. The elevator is trapped—stairs are safer but patrolled.
Timing: The Deaness enters a trance at 3:00 AM. She's vulnerable then, but so is the ritual—interrupting it causes backlash.
Objective: Rescue the Seven Students
The sacrifices are being held in the underground shrine. They'll be consumed at 4:00 AM to finalize the dome.
Location: Underground tunnels → Old Shrine (corrupted)
Guards: 2 Cultists + 1 Standard Alptrauma (Drowned Memory)
Stakes: Each student saved reduces the dome's power. All seven saved = dome unstable enough to collapse without the Sion Key.
Objective: Confront the Deaness
She's the ritual's anchor in this world. Defeating her doesn't end the dome—but it weakens it dramatically.
Location: Observatory (final confrontation)
Protection: Her Elite Alptrauma guardian + the Collector Boss
Weakness: Her guilt over Asano's death. If players have proof of the original murder, confronting her with it causes her to hesitate (loses 1 action).
Objective: Justice for the Past
Exposing the cover-up, giving voice to the silenced—these weaken the domain's hold on reality.
Coach Ashima: Confronting him publicly (at least 10 witnesses) causes a psychic backlash that stuns all cultists for 1 round.
The Recording: If players found evidence of the original gala deaths and broadcast it (PA system, still working), surviving guests become allies instead of panicking civilians.
The Names: Speaking the names of the 37 original victims in the observatory weakens the dome's barrier by 20% per name (mechanic: each name = +1 to Sion Key activation roll).
Act 5: The Observatory Confrontation
The final battle. The Deaness, her protectors, and the fate of everyone in the dome.
BATTLE SETUP:
The observatory is a circular room with a glass dome (now purple-black energy). The ritual circle is in the center.
- The Deaness (Non-Combatant): She stands in the ritual circle, channeling. She doesn't fight—but she has protectors.
- The Collector (Boss): Her personal guardian. It stays within 10 feet of her at all times.
- Spectral Husks (2-4): Former victims. They attack anyone approaching the circle.
- Ritual Circle: Entering it without protection deals 2 damage per round (Domain energy). The Sion Key negates this.
VICTORY CONDITIONS:
- Activate Sion Key in Circle: Drop + Anima (Challenging). Requires being in the circle for 1 full round. Closes all portals, collapses dome.
- Defeat the Collector: The Deaness loses protection. She can be forced to break concentration (Drop + Umbra, Tricky—social confrontation).
- Break the Deaness's Concentration: Present proof of her crimes. Speak the victims' names. Remind her of who she was. Each success = -1 to her mental defenses.
- Destroy the Observatory: Explosives, fire, or structural damage (Drop + Forma, Very Hard). Ends the ritual violently. Backlash damages everyone in range.
THE DEANESS'S LAST STAND:
If players successfully break her concentration, she has one final gambit:
"You think you're saving them? The Domain already has them. Everyone who felt fear tonight—it's tasted them. It knows their names. It will come back. In their dreams. In their children's dreams. The only way to end this... is to give it what it wants. Me."
She offers herself as the final sacrifice—absorbing the dome's energy into herself and becoming a permanent resident of Nowhere Land. This closes the dome instantly, saves everyone... but condemns her soul.
Player Choice: Let her sacrifice herself (clean ending) or refuse (she survives, dome closes via Sion Key, but she's now a loose end in the mundane world with Nowhere Land knowledge).
Act 5: Other Encounters
Random and planned encounters during the Soul Craze:
WANDERING ENCOUNTER TABLE (Roll d6 every 15 minutes in-game):
- 1-2: Spectral Husk Pack: 1d4+1 Minor Alptraumas hunting in a group. They flee if 50% are destroyed.
- 3: Survivor Group: 2d6 terrified guests huddled in a classroom. They'll follow players if protected, or scatter if abandoned.
- 4: Cultist Patrol: 2 cultists searching for specific targets. They have a list—and player names are on it.
- 5: The Sentinel: An Elite Alptrauma stalking a specific corridor. Can be avoided with stealth (Drop + Umbra, Challenging) or distracted with a sacrifice (a belonging, a memory, a name).
- 6: Reality Bleed: A portal opens nearby, showing a glimpse of Nowhere Land. Beautiful and terrifying. Drop + Reverie (Tricky) or be mesmerized for 1 round.
ALLY REUNIONS:
- Satoshi Konda: If players helped him earlier, he finds them with supplies: a map of current patrol routes, 2 doses of anti-sedative, and the spare Sion Key prototype (damaged, works once).
- Mina Nikagawa: If players saved her, she uses her celebrity to rally survivors. She can create a distraction anywhere on campus (draws Alptraumas to her location for 1d4 rounds).
- Coach Ashima: If redeemed, he knows the cultists' communication frequency. He can mislead them, sending patrols to wrong locations.
Possible Endings
Resolution Outcomes
Each ending has mechanical triggers and narrative consequences. Players can combine approaches for hybrid endings.
ENDING A: The Seal (Best Outcome)
Use the Sion Key in the observatory ritual circle while the Deaness is neutralized.
All portals snap closed. The dome shatters like glass, dissolving into purple mist. Alptraumas are yanked back to Nowhere Land. Survivors collapse, exhausted but alive. Dawn comes. Police and ambulances arrive—called by neighbors who noticed the campus "flickering."
Minimal (only those taken before midnight + any NPCs who died during the night).
Players are now Marked by the Domain. They can see the thin places—doorways to Nowhere Land that others can't perceive. The Domain remembers them. Someday, it will reach out again.
ENDING B: The Passage (Campaign Transition)
One or more players voluntarily enter a portal, OR the Deaness pushes them through as a last act.
Players fall through reality. They land in The Passage—the liminal space between worlds. Behind them, the portal closes. Ahead of them... infinite doorways. They are now Outsiders, travelers between domains.
The dome eventually collapses at dawn (4 hours of terror for survivors). Higher casualties. Players' mundane lives are over—they're listed as missing, presumed dead.
This is the start of a full Nowhere Land campaign. Players can explore domains, learn the rules of between-spaces, and eventually find a way back—if they want to. The pre-generated characters become their permanent Outsider identities.
ENDING C: The Compromise (Bittersweet)
Successfully negotiate with the Domain (Drop + Reverie, Epic) or offer a meaningful sacrifice (a player's most treasured memory, someone's willing soul, a binding oath).
The Alptraumas retreat. The dome remains—but dormant. The campus becomes a threshold, a meeting place between worlds. Not hostile, but not safe. The Domain accepts the school as a permanent embassy.
Survivors are safe but changed. Everyone who was present can now sense the supernatural. Some become Travelers. Some go mad. Some pretend it never happened.
Players become guardians of the threshold. They must prevent others from stumbling through, deal with entities that visit, and manage the intersection of mundane and Domain. A different kind of campaign—more urban fantasy than survival horror.
ENDING D: The Reckoning (Pyrrhic Victory)
Destroy the observatory physically (explosives, structural damage, fire).
The dome collapses violently. Reality shrapnel. The explosion is visible for miles—a pillar of purple light that news stations will later attribute to "industrial accident." The Deaness is caught in the blast. So is everyone within 100 meters of the observatory.
Heavy. The Deaness is dead (or worse—scattered across dimensions). Anyone in the observatory at detonation makes a Drop + Forma (Very Hard) check or takes catastrophic damage. Some areas of campus are now permanently "thin"—reality bleeds there forever.
The truth comes out. The cover-up. The abuse. The cult. Investigations follow. Some players may be heroes—others may be suspects in "mass murder." Justice has a price, and someone always pays it.
ENDING E: The Harvest (Failure)
Players fail to act decisively, or all are killed/taken before 4:00 AM.
The ritual completes. The seven students are consumed. The dome becomes permanent—a new domain forming in the mundane world. The campus is now Nihongi, a Domain, visible to the outside world as a "zone of exclusion" that authorities cannot enter or explain.
Most guests are dead or taken. The Deaness becomes the domain's Trickster. Alptraumas roam freely within the dome's bounds. The outside world quarantines the area and pretends it doesn't exist.
If any players survived (escaped before 4:00 AM), they're marked, hunted, and know too much. A different campaign—fugitives with forbidden knowledge, trying to find a way to close a Domain that's grown into the real world.
Epilogue: After the Night
What happens after the credits roll? Here are scenes to close the story:
For Kenji (The Investigator):
The records are unsealed. The truth is published. Families of the original 37 victims finally have answers. But now Kenji knows too much. His next story might be about what's really out there in the dark.
For Yuki (The Athlete):
Coach Ashima faces justice—or doesn't. Either way, Yuki spoke her truth. The first domino fell. Other survivors are coming forward. The silence is broken. What Yuki does with her new voice is her choice.
For Hana (The Artist):
Her next exhibition is different. She paints what she saw—the dome, the Alptraumas, the thin places. Critics call it "visionary." They don't know how literal that is. The Domain watches her paint. It's curious.
For Takeshi (The Peacekeeper):
He kept the group together. He protected people. Now he has new responsibilities—watching for the signs he learned to recognize. Helping others when the thin places call. He's not done protecting.
For Satoshi (If He Survived):
Twenty years of watching. Twenty years of waiting. Someone finally listened. He can rest now... or he can teach. The next generation of watchers needs a mentor. Does he have more fight in him?
For the School:
Nihongi Academy closes permanently. The campus is demolished—or preserved as a "historical site" with very strict visiting hours. Something remains in the foundations. Something always remains.
Campus Reference Map
Nihongi University Campus Layout (ASCII)
╔══════════════════════════════════════════════════════════════════╗
║                    NIHONGI UNIVERSITY CAMPUS                      ║
║                    (There Again Scenario Map)                     ║
╠══════════════════════════════════════════════════════════════════╣
║                                                                   ║
║     ┌─────────────────┐              ┌──────────────────┐        ║
║     │   OBSERVATORY   │◄─────────────│   SCIENCE BLOCK  │        ║
║     │   ★ Portal      │   Rooftop    │  [Asano's Lab]   │        ║
║     │     Origin      │   Access     │   Research       │        ║
║     └────────▲────────┘              └────────┬─────────┘        ║
║              │                                │                   ║
║              │                                │                   ║
║     ┌────────┴────────────────────────────────┴─────────┐        ║
║     │                                                    │        ║
║     │              CENTRAL AUDITORIUM                    │        ║
║     │            [MAIN GALA VENUE]                       │        ║
║     │         ★ Deaness's Office (Top Floor)             │        ║
║     │         ★ Midnight Announcement Stage              │        ║
║     │                                                    │        ║
║     └────────────────────────┬───────────────────────────┘        ║
║                              │                                    ║
║          ┌───────────────────┼───────────────────┐               ║
║          │                   │                   │               ║
║  ┌───────┴───────┐   ┌───────┴───────┐   ┌───────┴───────┐       ║
║  │   LIBRARY &   │   │    SPORTS     │   │   PRIMARY     │       ║
║  │  ARTS BLOCK   │   │   COMPLEX     │   │    SCHOOL     │       ║
║  │ [High School] │   │[Middle School]│   │    BLOCK      │       ║
║  │               │   │               │   │               │       ║
║  │ - Art Rooms   │   │ - Gymnasium   │   │ - Garden      │       ║
║  │ - Music Room  │   │ - Pool        │   │ - Hothouses   │       ║
║  │ - Theater     │   │ - Track       │   │ - Underground │       ║
║  │ - Library     │   │ - Dojo        │   │   Tunnels ★   │       ║
║  │   Archives    │   │ - Equipment   │   │               │       ║
║  │               │   │   Room        │   │               │       ║
║  └───────────────┘   └───────────────┘   └───────────────┘       ║
║                                                                   ║
║  ════════════════════════════════════════════════════════════    ║
║                         MAIN GATE                                 ║
║                     [Security Check]                              ║
║                  [Alternate Entrances:]                           ║
║           Garden Gate (West) │ Service Road (East)                ║
║                                                                   ║
╠══════════════════════════════════════════════════════════════════╣
║  KEY:  ★ = Key Location    ◄─ = Passage/Connection               ║
║        [ ] = Important Area                                       ║
╚══════════════════════════════════════════════════════════════════╝
Interactive Campus Map
Click on any location to view details. Dashed lines show connections between areas.
Nihongi University Campus
The sprawling campus of Nihongi University, site of the 20th Anniversary Alumni Gala.
Click on a location to explore
GM Quick Reference
Session Pacing Guide
For a 4-hour one-shot, here's the recommended time breakdown:
First Hour (Setup)
- 0:00-0:15:
- 0:15-0:30:
- 0:30-1:00:
Second Hour (Investigation)
- 1:00-1:30:
- 1:30-2:00:
Third Hour (Escalation)
- 2:00-2:30:
- 2:30-3:00:
Final Hour (Climax)
- 3:00-3:30:
- 3:30-3:50:
- 3:50-4:00:
NPC Quick Reference Cards
Copy these cards for easy reference during play:
SATOSHI KONDA (Ally)
Janitor / Survivor / Guide
To stop the ritual, avenge his friends
Tunnel locations, mystery origins, Sion Key location
Quiet, urgent, speaks in fragments when stressed
I waited twenty years. You're the first to listen.
DEANESS HAYASHI (Antagonist)
Cult leader / Ritual anchor
Complete the ritual, elevate herself to Trickster status
Everything about the school, the Domain, the history
Calm, maternal, terrifyingly reasonable
The Domain doesn't hate you. It needs you. There's a difference.
COACH ASHIMA (Complex)
Abuser / Cultist / Potential Redemption
Power, respect, to avoid consequences
Cultist signals, patrol routes, staff secrets
Booming, confident until confronted, then defensive
You don't understand what you're accusing me of.
MINA NIKAGAWA (Wildcard)
Celebrity / Victim / Distraction
Death (secretly), rescue (deeply)
The price she paid, the deal she made
Performative joy masking deep exhaustion
Fame has a price. Tonight I pay in full.
Additional Resources
This complete scenario includes all acts as presented. Additional downloadable resources: